Integrating The Things Network with MongoDB Atlas
In this blog post I will show how data can be sent between LoRaWAN devices hosted in The Things Network and MongoDB with the help of the components available in MongoDB Atlas cloud service.
Introduction
This blog post will cover:
- Receive (Uplink) telemetry data sent from a LoRaWAN device and store it in a MongoDB time series database collection. - Telemetry data is sent on LoRaWAN Port 1 from the end-device.
- Receive (Uplink) settings/config data sent from a LoRaWAN device and store it in a “device twin” database collection. - Device config information is sent on LoRaWAN Port 2 from the end-device.
- Send changes that occurs in the “deviceTwins” collection documents as downlinks to the LoRaWAN corresponding device.
- Decode/Encode the LoraWAN device payload in a MongoDB Atlas Function.
MongoDB Atlas/App Services
MongoDB Atlas/App Services is a cloud service that provides several different services which (apart from the database) can be used to create a complete solution:
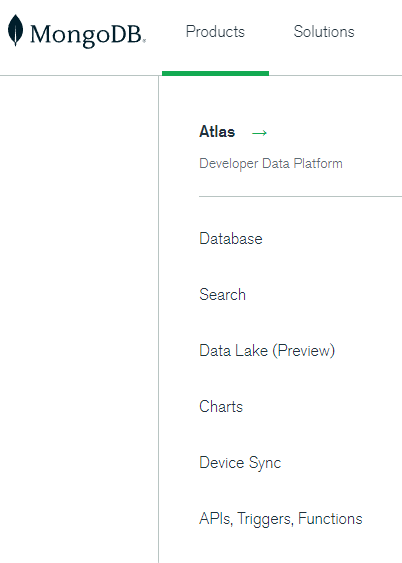
In this blog post, we will use the following components which as of the time of writing this article are free of charge:
- MongoDB - The database service in which we will store our data.
- App Services:
- HTTPS Endpoint - An HTTPS endpoint will be created to which we will tell TTN to send the data coming from the LoRaWAN device.
- Triggers - An “OnChange” trigger will initiate a function when a change occurs.
- Functions - Two functions will be used. One will be triggered by TTN as a Webhook and the other function will be triggered when there is a change on the database collection.
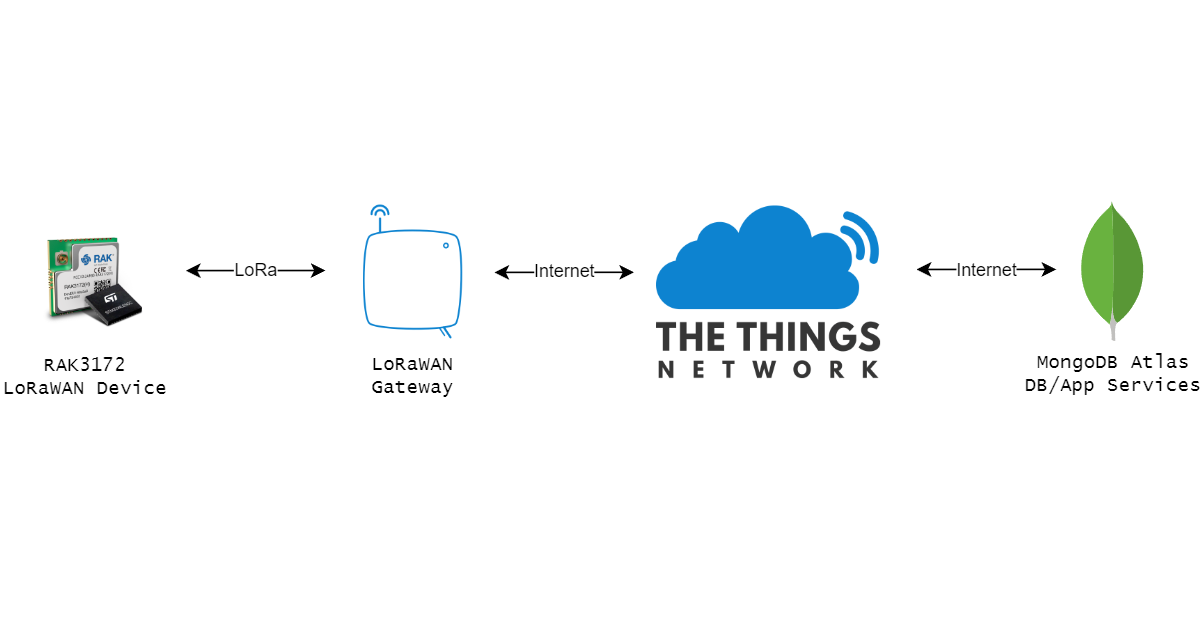
LoRaWAN - The Things Network
The Things Network (TTN) will provide us with the services related to LoRaWAN. In this blog the following LoRaWAN infrastructure exists:
- A LoRaWAN gateway connected to TTN.
- A RAKwireless RAK3172 LoRaWAN device with an environmental BME680 connected to it. This device also has a red and a green LED which can be controlled via downlink messages.
LoRaWAN - End Device
A custom LoRaWAN device has be built for this blog/demo based on the RAK3172 module from RAKwireless. This module contains a STM32WL chip along with a SEMTECH LoRaWAN modem. The firmware for RAK3172 can be developed and flashed “thru” Arduino and there is no need for an additional micro controller:
-
Two LED:s connected to the RAK3172 which can be individually controlled via downlink messages.
-
Send interval (in minutes) can be controlled thru a downlink message due to the custom firmware being used.
-
A BME680 Environmental sensor is connected to the RAK3172 via I2C. The BME680 measures temperature, humidity, air pressure and gas content. This data is sent via LoRaWAN to TTN based on the configured send_interval which is defined in minutes:
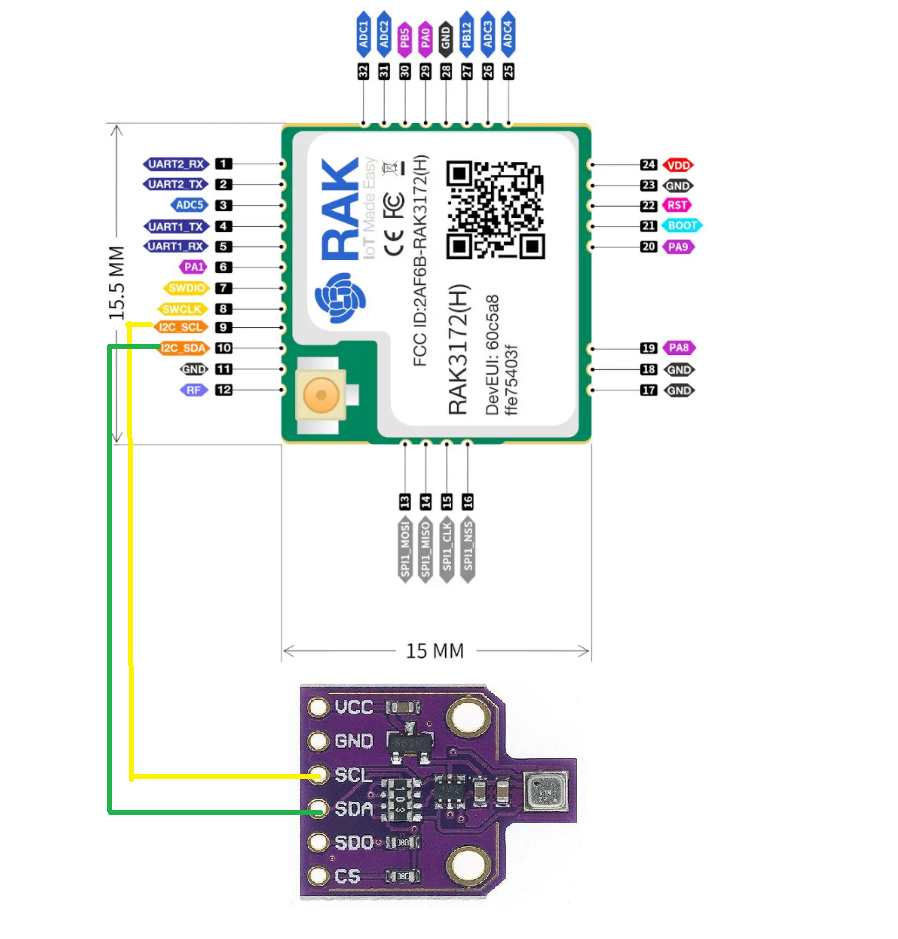
If you are interested in the code running on the RAK3172 module, you’ll find it here: RAK3172-BME680 device
Let’s get started!
The Things Network
A TTN webhook needs to be created thru the TTN console.
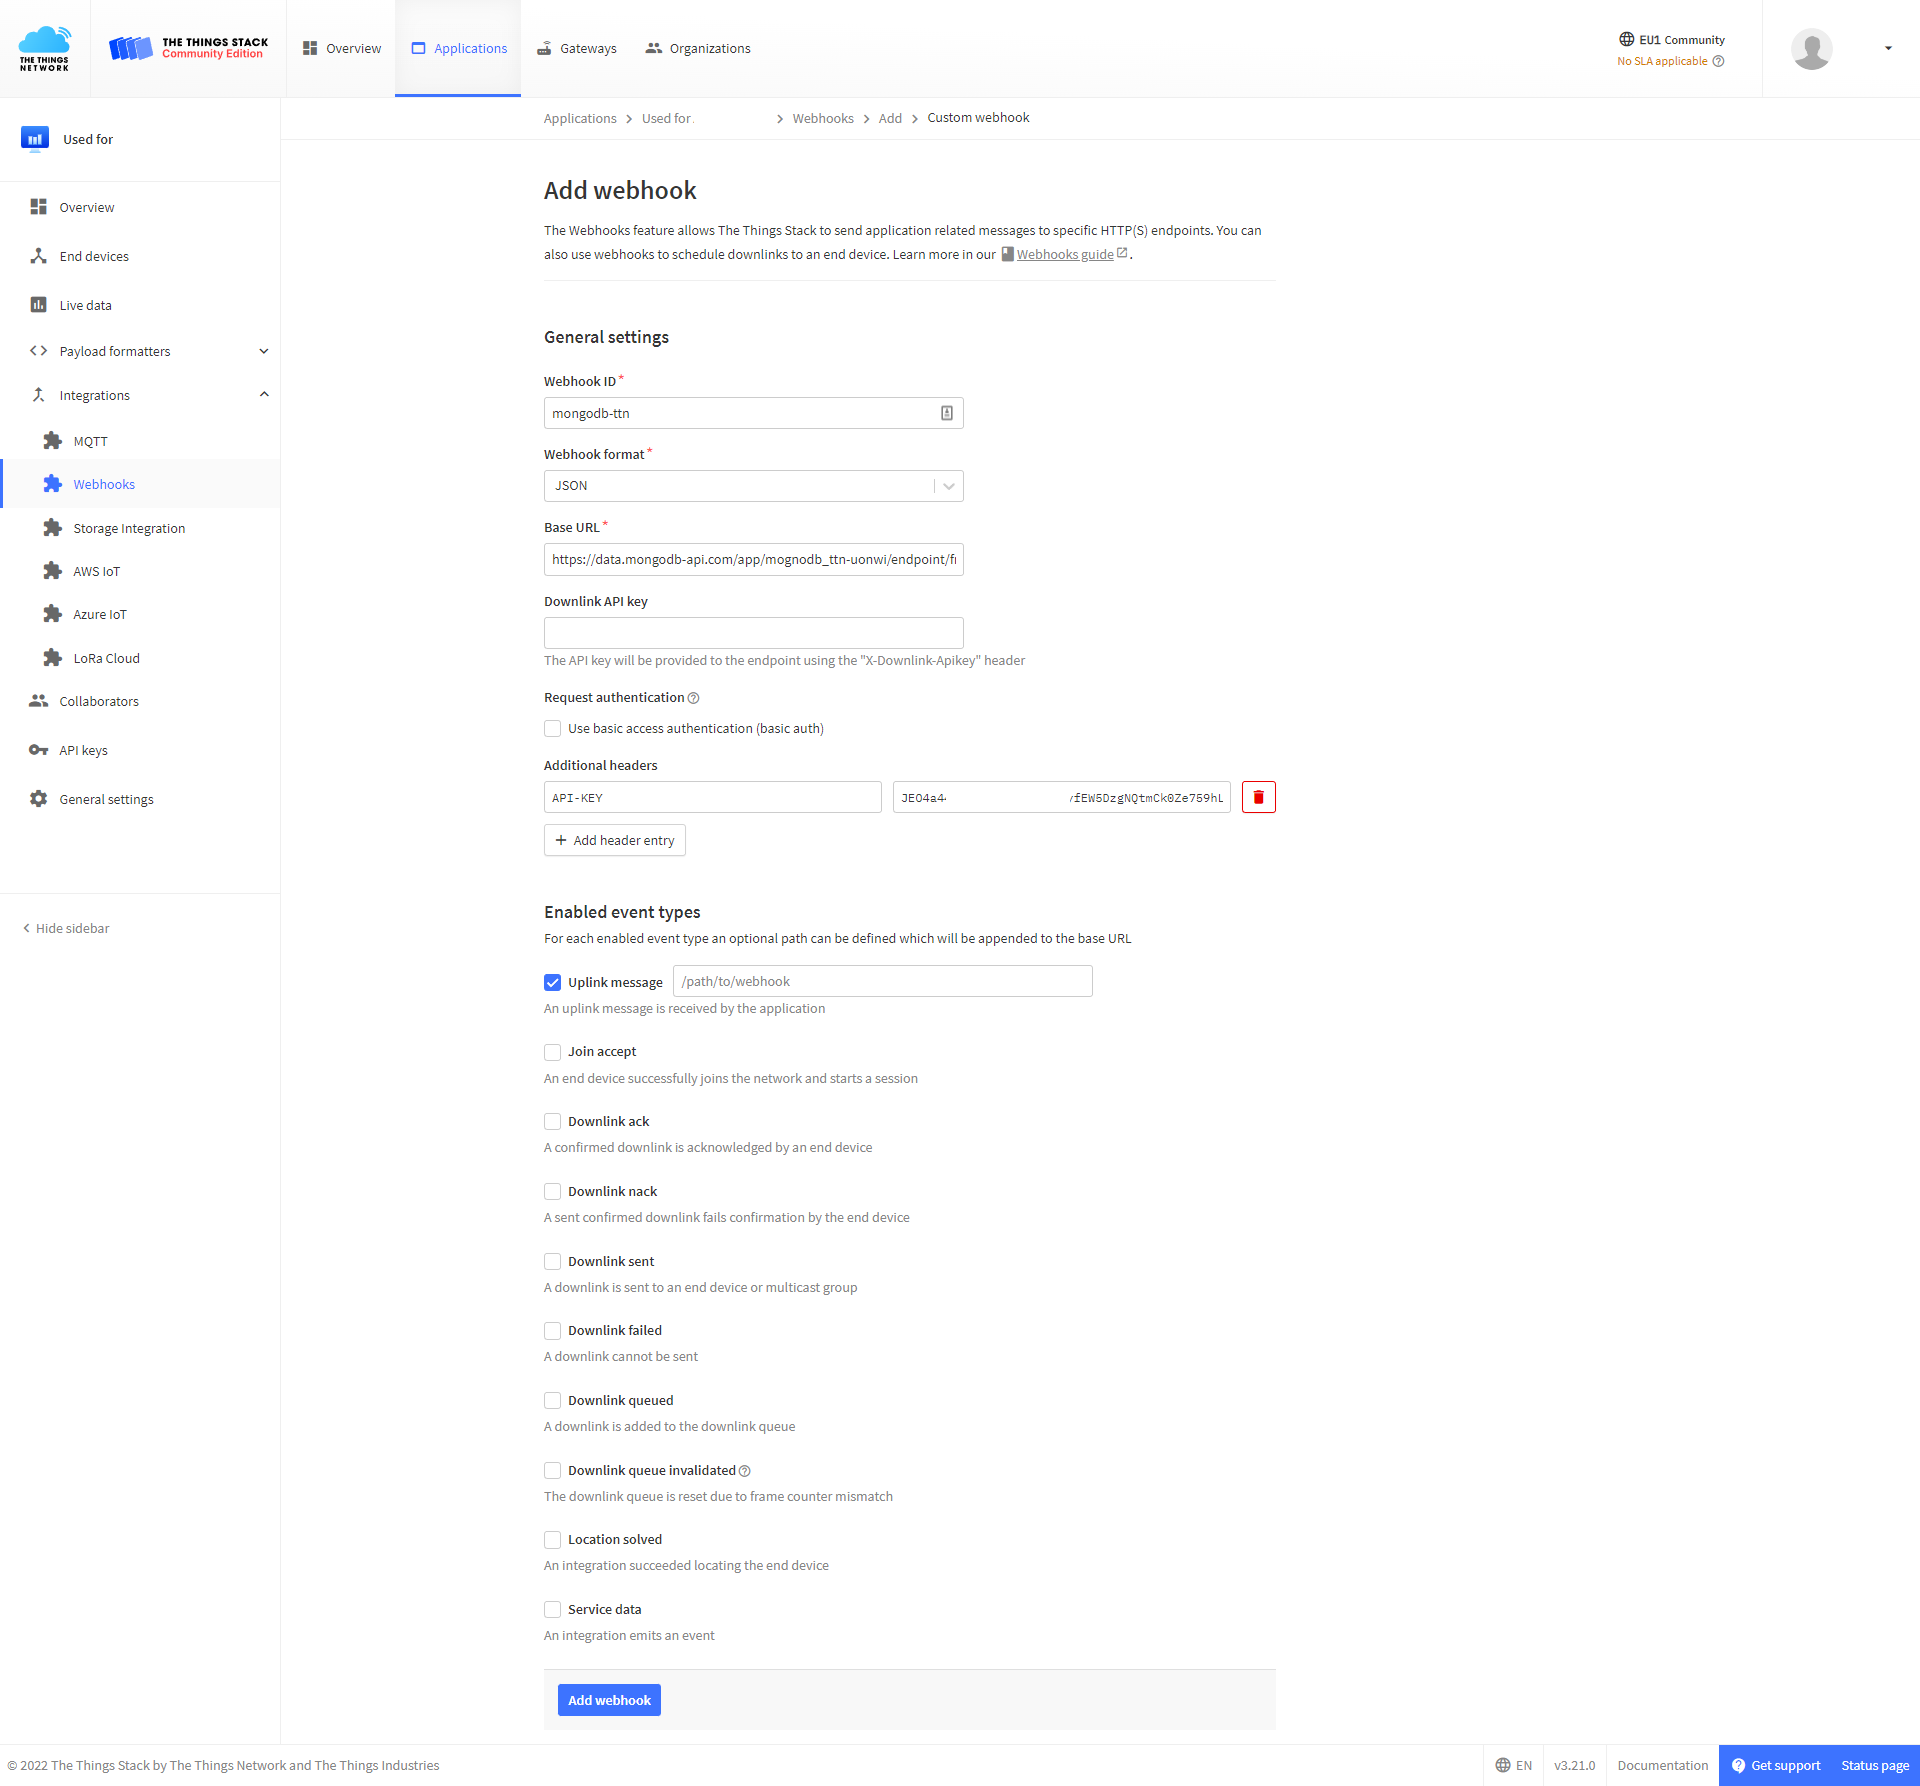
In TTN, add a new webhook:
- “Base URL” should point to the URL that we will receive in later steps when have created the “HTTPS Endpoint” in MongoDB Atlas. - Until then, add a random URL.
- “Additional headers” needs to be configured since MongoDB HTTPS Endpoint expects a header named “API-KEY” containing the key. - We will generate an API-KEY in later steps so insert a random one until later.
- In this demo, we only want “Uplink message”
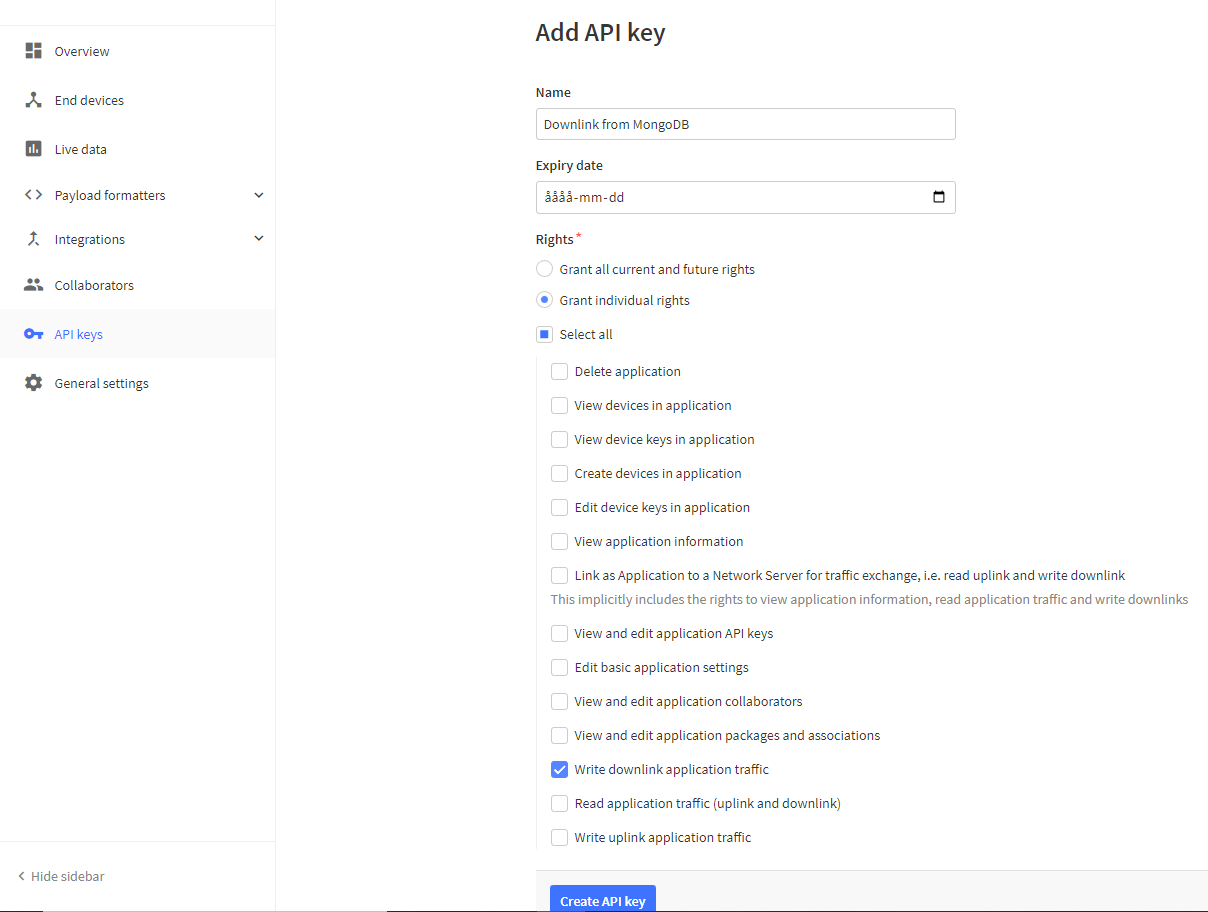
In TTN, create a new API key. Take note of the key generated since we need to insert it into MongoDB values later:
MongoDB
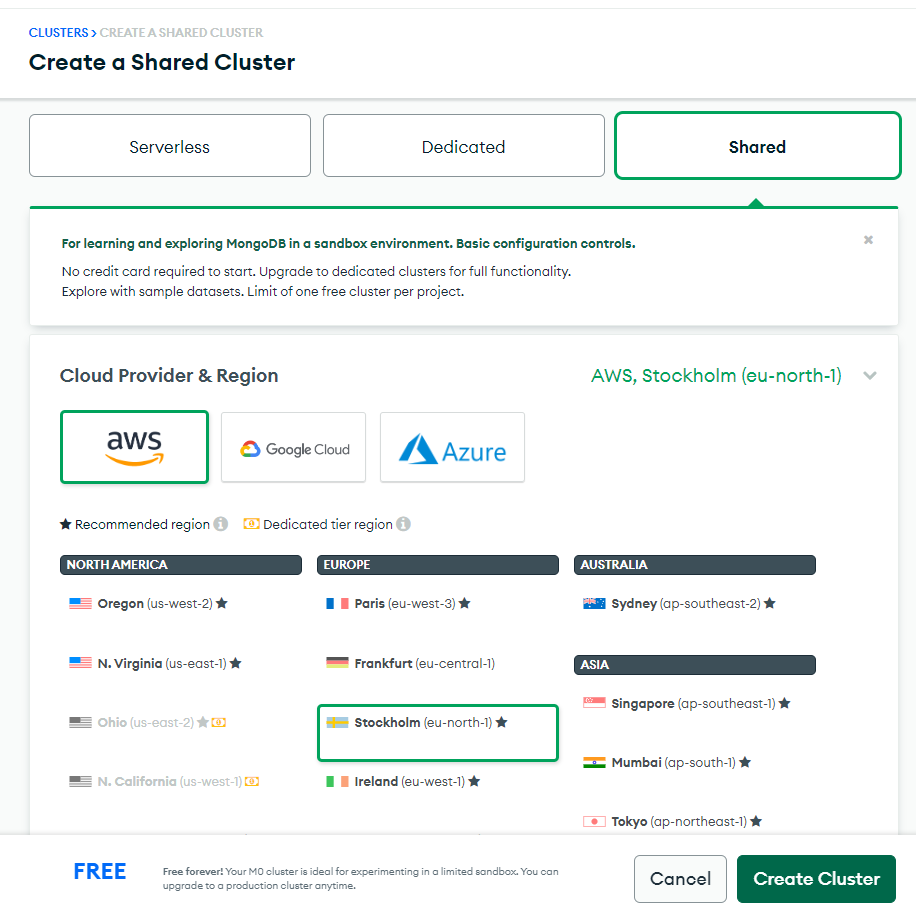
Create cluster
We need to create a cluster which will host our database:
Create database and collections
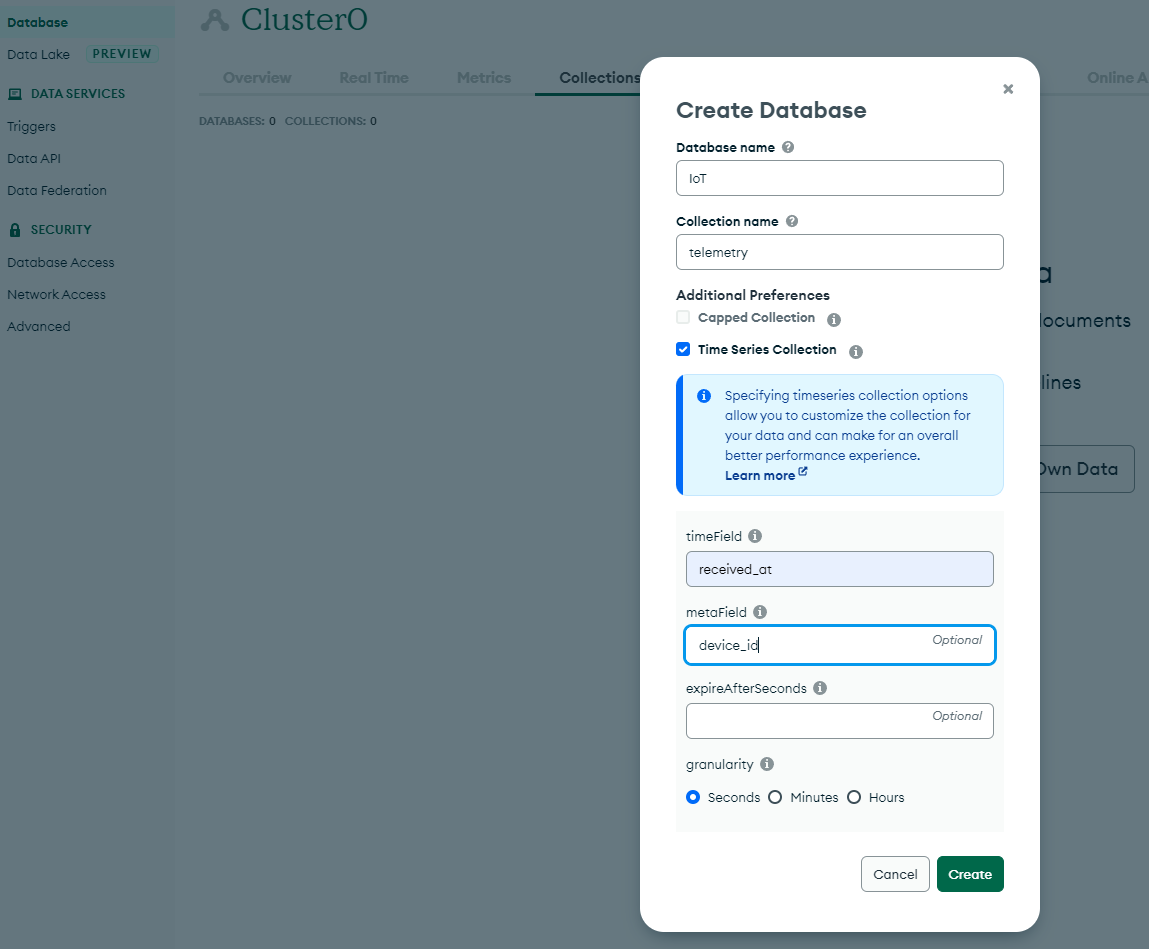
Create the database which will hold our data. During database creation, we also create the collection for our time series data
Time series collections requires us manually specify the timeField. We also want to add the device_id as a metadata field:
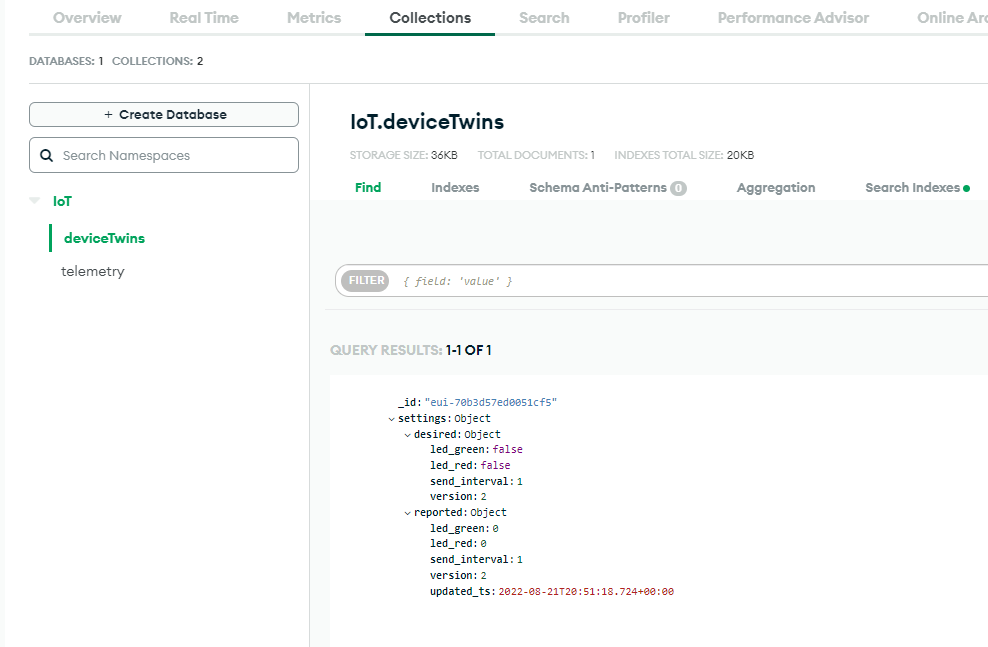
We need one more collection to hold our “device twin” data. This collection will hold a document for each device, and the document will contain the desired and reported device settings:
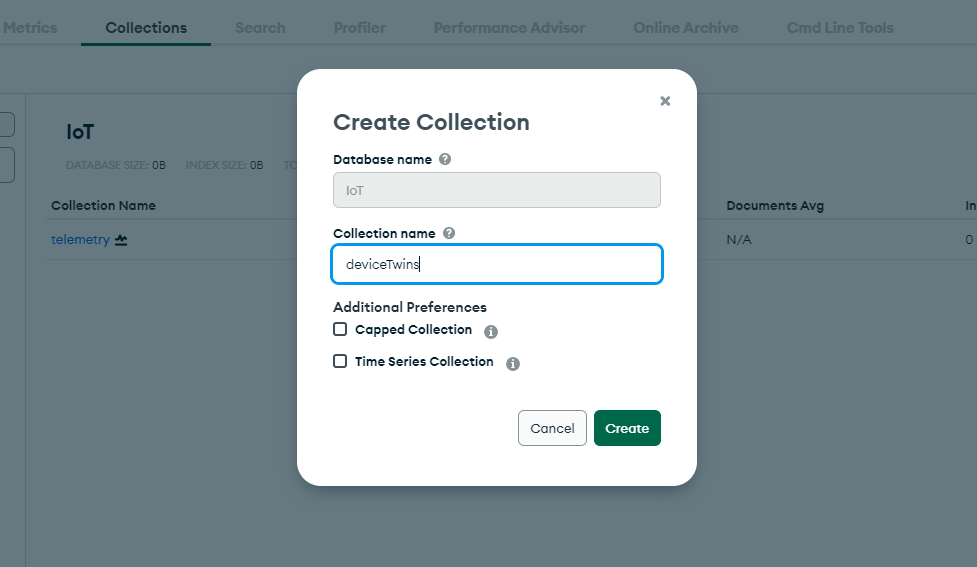
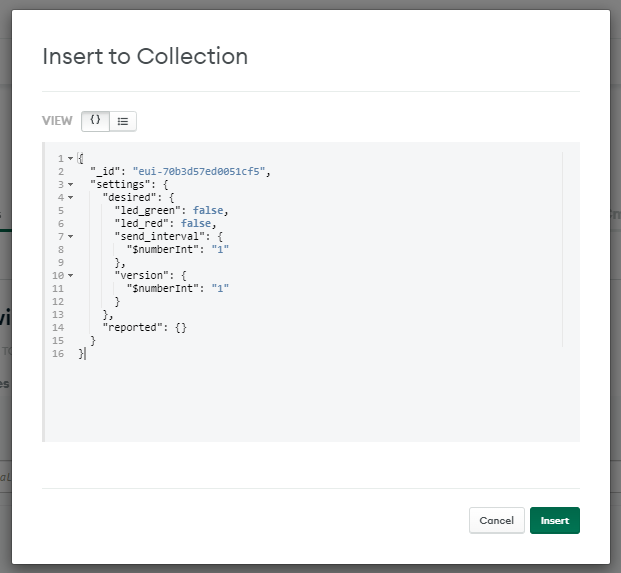
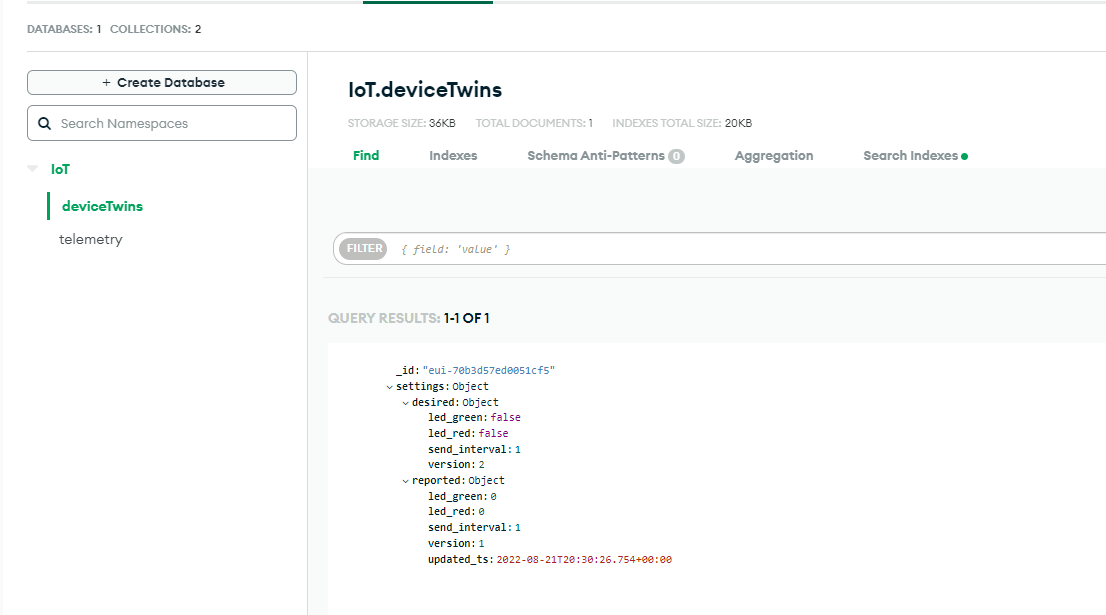
Once the deviceTwins collection has been created, then we insert a new document into the database with a _id that matches the LoRaWAN device ID in The Things Network
The document contains a “desired” which controls how we WANT the device to be configured. The “reported” part of the document contains the configuration reported by the LoRaWAN device:
{
    "_id": "eui-70b3d57ed0051cf5",
    "settings": {
        "desired": {
            "led_green": false,
            "led_red": false,
            "send_interval": {
                "$numberInt": "1"
            },
            "version": {
                "$numberInt": "1"
            }
        },
        "reported": {
        }
    }
}
MongoDB App Services
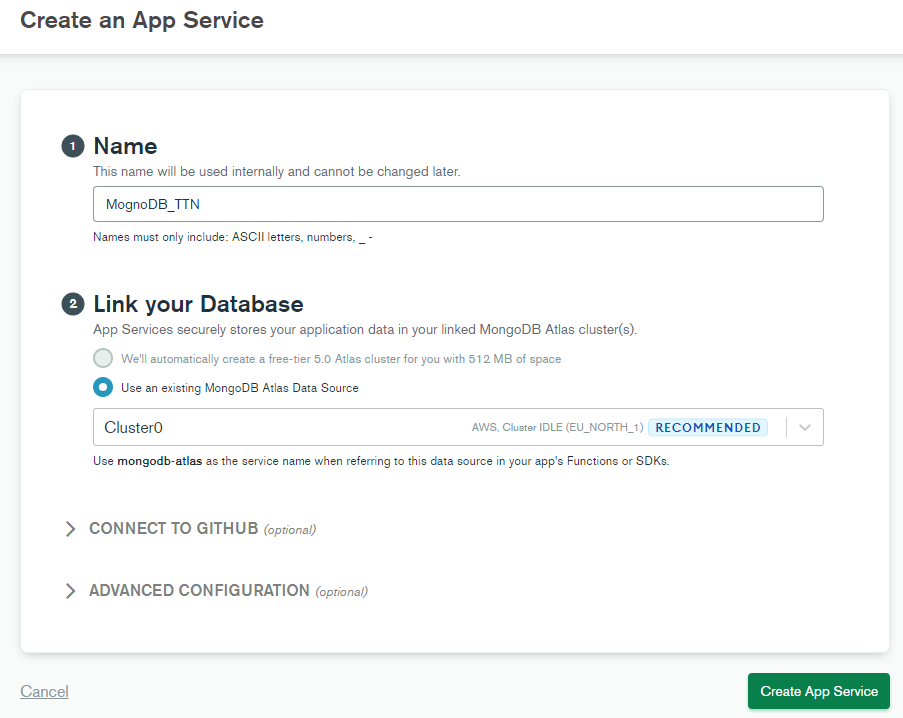
First, we need to create a new “App Service” in which we can create HTTPS Endpoints, Triggers and Functions later on.
Create App Service
Create a new App Service thru the web portal:
Create Functions
We will need two functions. One which will be triggered by the webhook initiated from The Things Network, and a second one which will be triggered when there is a change on a document in the deviceTwins collection.
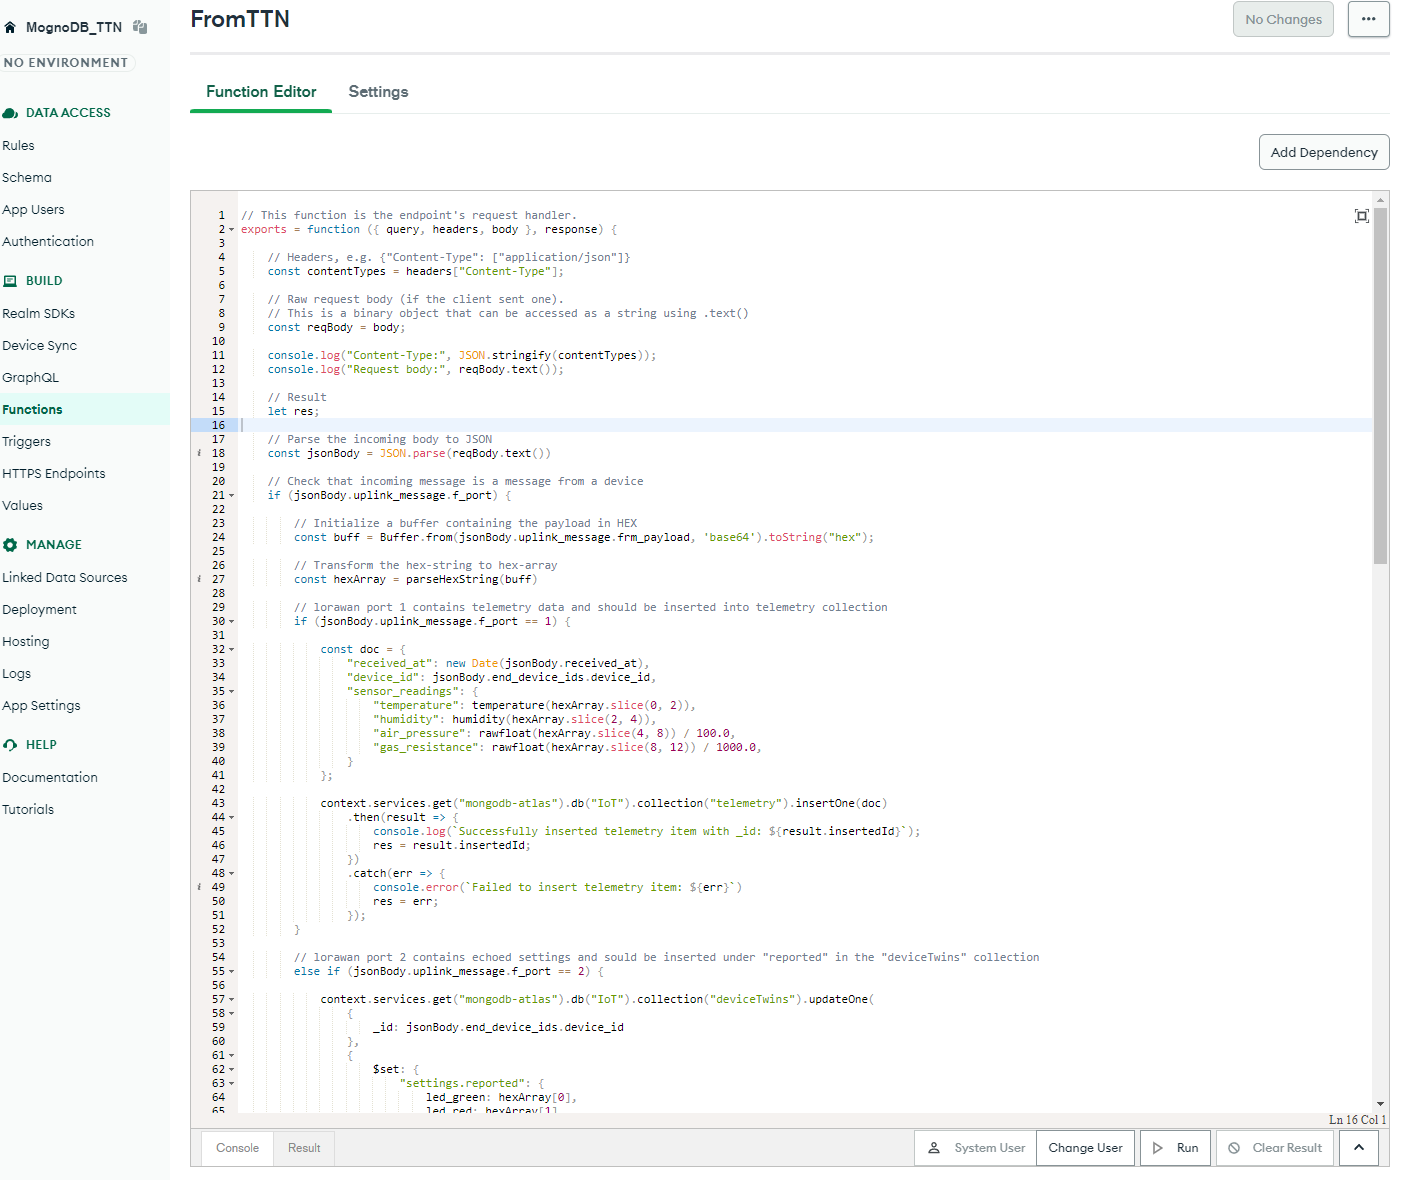
First, we create the Function which will be executed by the TTN webhook.
This function will take the input from TTN, decode the payload, and then insert the data to the telemetry collection if the LoRaWan port is equal to “1”. If the LoRaWAN port is equal to “2”, then data is inserted into the deviceTwins collection.
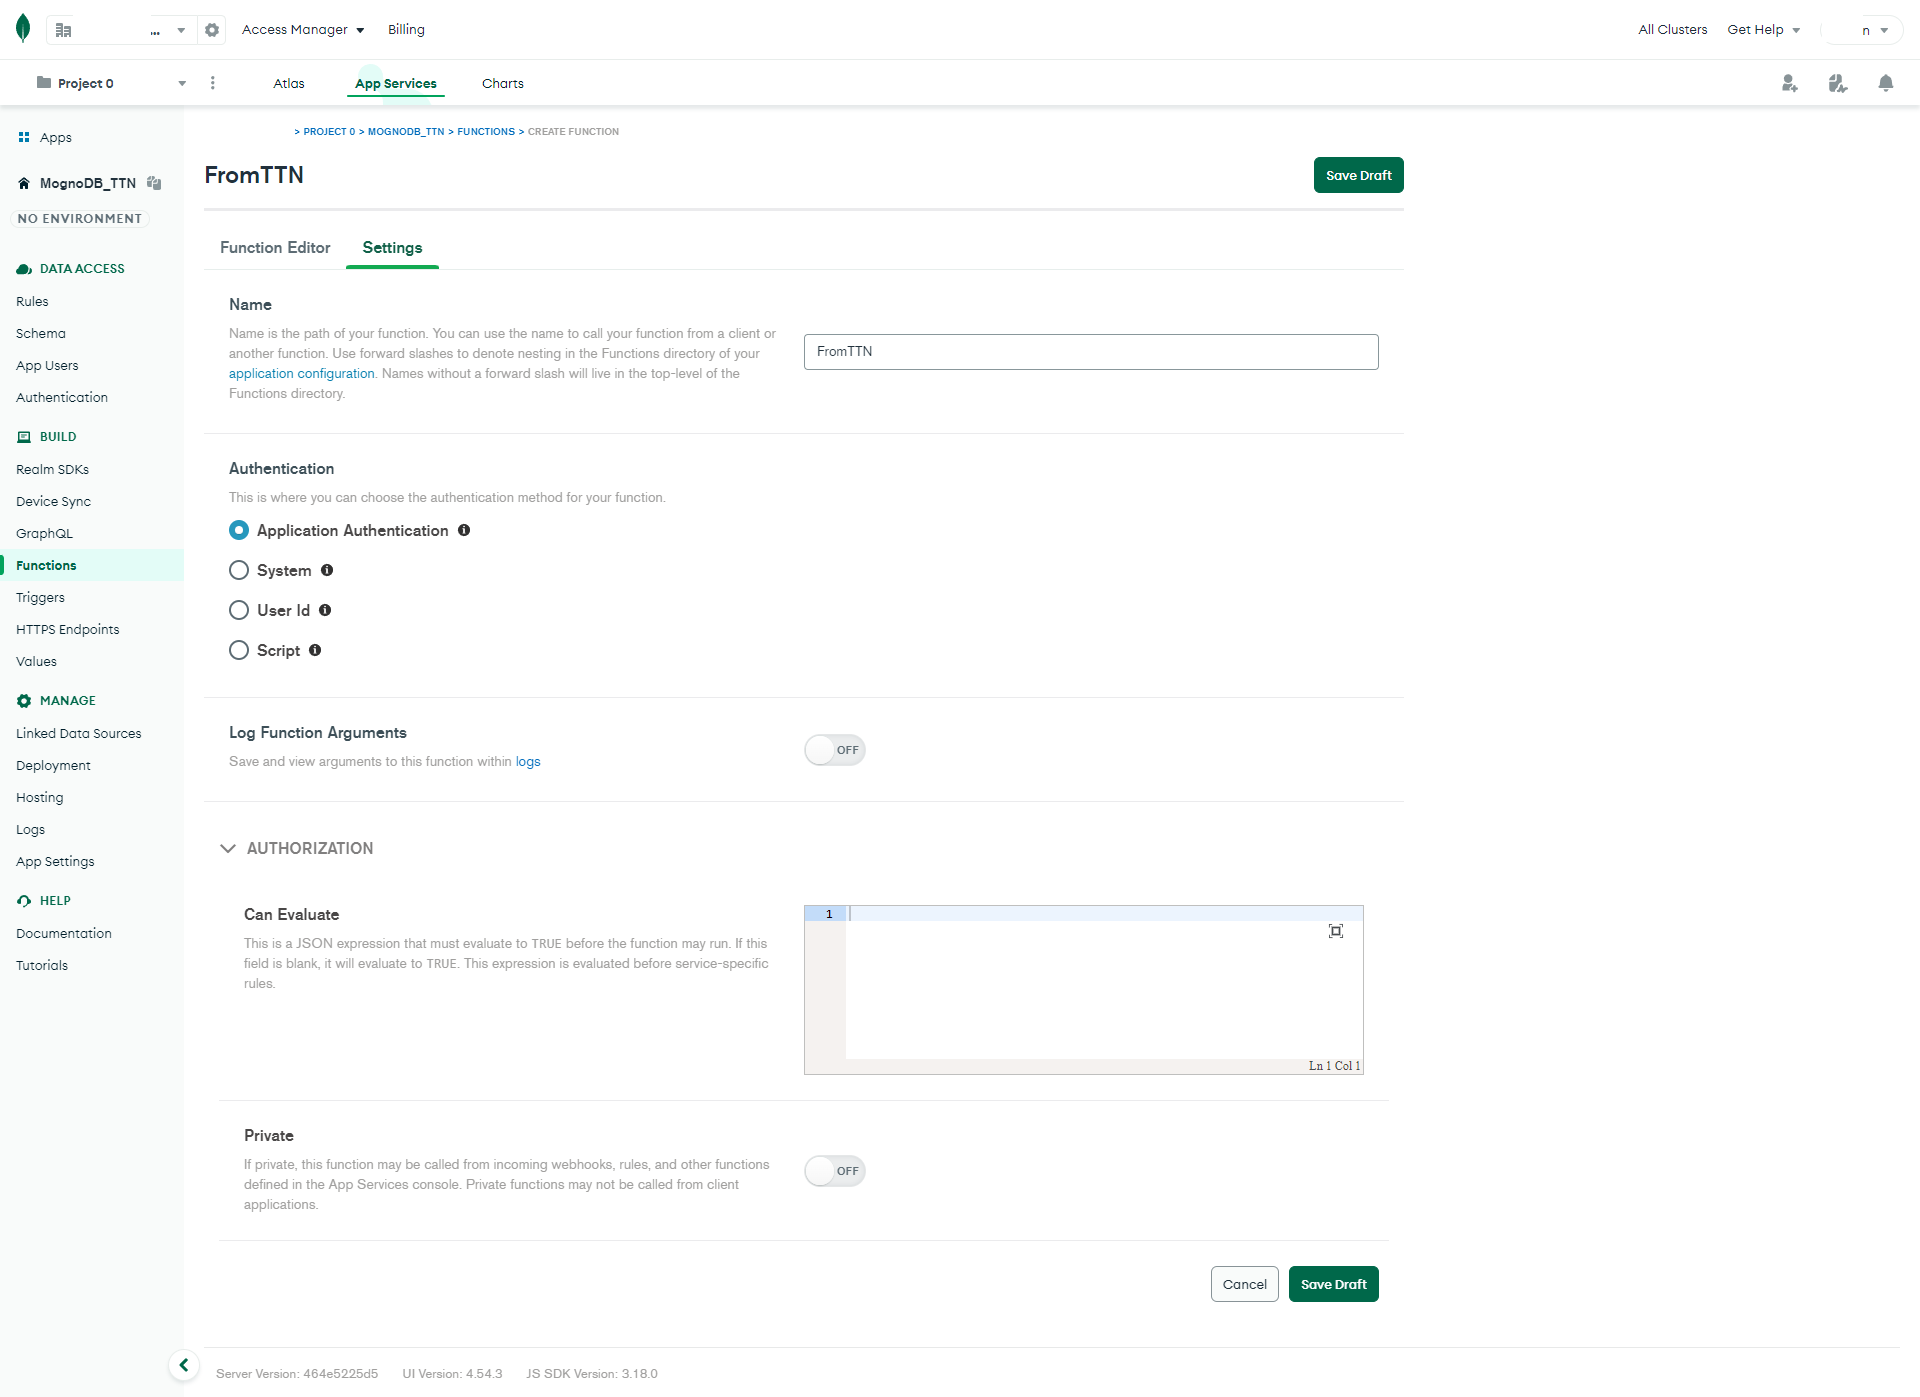
Navigate to “Function editor” and insert the code below:
// This function is the endpoint's request handler.
exports = function ({ query, headers, body }, response) {

    // Headers, e.g. {"Content-Type": ["application/json"]}
    const contentTypes = headers["Content-Type"];

    // Raw request body (if the client sent one).
    // This is a binary object that can be accessed as a string using .text()
    const reqBody = body;

    console.log("Content-Type:", JSON.stringify(contentTypes));
    console.log("Request body:", reqBody.text());

    // Result
    let res;

    // Parse the incoming body to JSON
    const jsonBody = JSON.parse(reqBody.text())

    // Check that incoming message is a message from a device
    if (jsonBody.uplink_message.f_port) {

        // Initialize a buffer containing the payload in HEX
        const buff = Buffer.from(jsonBody.uplink_message.frm_payload, 'base64').toString("hex");

        // Transform the hex-string to hex-array
        const hexArray = parseHexString(buff)

        // lorawan port 1 contains telemetry data and should be inserted into telemetry collection
        if (jsonBody.uplink_message.f_port == 1) {

            const doc = {
                "received_at": new Date(jsonBody.received_at),
                "device_id": jsonBody.end_device_ids.device_id,
                "sensor_readings": {
                    "temperature": temperature(hexArray.slice(0, 2)),
                    "humidity": humidity(hexArray.slice(2, 4)),
                    "air_pressure": rawfloat(hexArray.slice(4, 8)) / 100.0,
                    "gas_resistance": rawfloat(hexArray.slice(8, 12)) / 1000.0,
                }
            };

            context.services.get("mongodb-atlas").db("IoT").collection("telemetry").insertOne(doc)
                .then(result => {
                    console.log(`Successfully inserted telemetry item with _id: ${result.insertedId}`);
                    res = result.insertedId;
                })
                .catch(err => {
                    console.error(`Failed to insert telemetry item: ${err}`)
                    res = err;
                });
        }

        // lorawan port 2 contains echoed settings and sould be inserted under "reported" in the "deviceTwins" collection
        else if (jsonBody.uplink_message.f_port == 2) {

            context.services.get("mongodb-atlas").db("IoT").collection("deviceTwins").updateOne(
                {
                    _id: jsonBody.end_device_ids.device_id
                },
                {
                    $set: {
                        "settings.reported": {
                            led_green: hexArray[0],
                            led_red: hexArray[1],
                            send_interval: hexArray[2],
                            version: hexArray[3],
                            updated_ts: new Date(jsonBody.received_at)
                        }
                    }
                })
                .then(result => {
                    console.log(`Successfully inserted settings item with _id: ${JSON.stringify(result)}`);
                    res = result.insertedId;
                })
                .catch(err => {
                    console.error(`Failed to insert settings item: ${err}`)
                    res = err;
                });
        }
    }

    // The return value of the function is sent as the response back to the client
    // when the "Respond with Result" setting is set.
    return res;
};

/////////////////////////
/// Helper functions. ///
/////////////////////////

//Creates hex array from hex string
function parseHexString(str) {
    var result = [];
    while (str.length >= 2) {
        result.push(parseInt(str.substring(0, 2), 16));
        str = str.substring(2, str.length);
    }

    return result;
}

// Transform bytes to int
var bytesToInt = function (bytes) {
    var i = 0;
    for (var x = 0; x < bytes.length; x++) {
        i |= +(bytes[x] << (x * 8));
    }
    return i;
};

// Transform temperature
var temperature = function (bytes) {
    if (bytes.length !== temperature.BYTES) {
        throw new Error('Temperature must have exactly 2 bytes');
    }
    var isNegative = bytes[0] & 0x80;
    var b = ('00000000' + Number(bytes[0]).toString(2)).slice(-8)
        + ('00000000' + Number(bytes[1]).toString(2)).slice(-8);
    if (isNegative) {
        var arr = b.split('').map(function (x) { return !Number(x); });
        for (var i = arr.length - 1; i > 0; i--) {
            arr[i] = !arr[i];
            if (arr[i]) {
                break;
            }
        }
        b = arr.map(Number).join('');
    }
    var t = parseInt(b, 2);
    if (isNegative) {
        t = -t;
    }
    return t / 1e2;
};
temperature.BYTES = 2;

// Transform humitidy
var humidity = function (bytes) {
    if (bytes.length !== humidity.BYTES) {
        throw new Error('Humidity must have exactly 2 bytes');
    }

    var h = bytesToInt(bytes);
    return h / 1e2;
};
humidity.BYTES = 2;

// Transform raw float (4 bytes)
function rawfloat(bytes) {
    if (bytes.length !== rawfloat.BYTES) {
        throw new Error('Float must have exactly 4 bytes');
    }
    // JavaScript bitwise operators yield a 32 bits integer, not a float.
    // Assume LSB (least significant byte first).
    var bits = bytes[3] << 24 | bytes[2] << 16 | bytes[1] << 8 | bytes[0];
    var sign = (bits >>> 31 === 0) ? 1.0 : -1.0;
    var e = bits >>> 23 & 0xff;
    var m = (e === 0) ? (bits & 0x7fffff) << 1 : (bits & 0x7fffff) | 0x800000;
    var f = sign * m * Math.pow(2, e - 150);
    return f;
}
rawfloat.BYTES = 4;
Click “Review and deploy”.
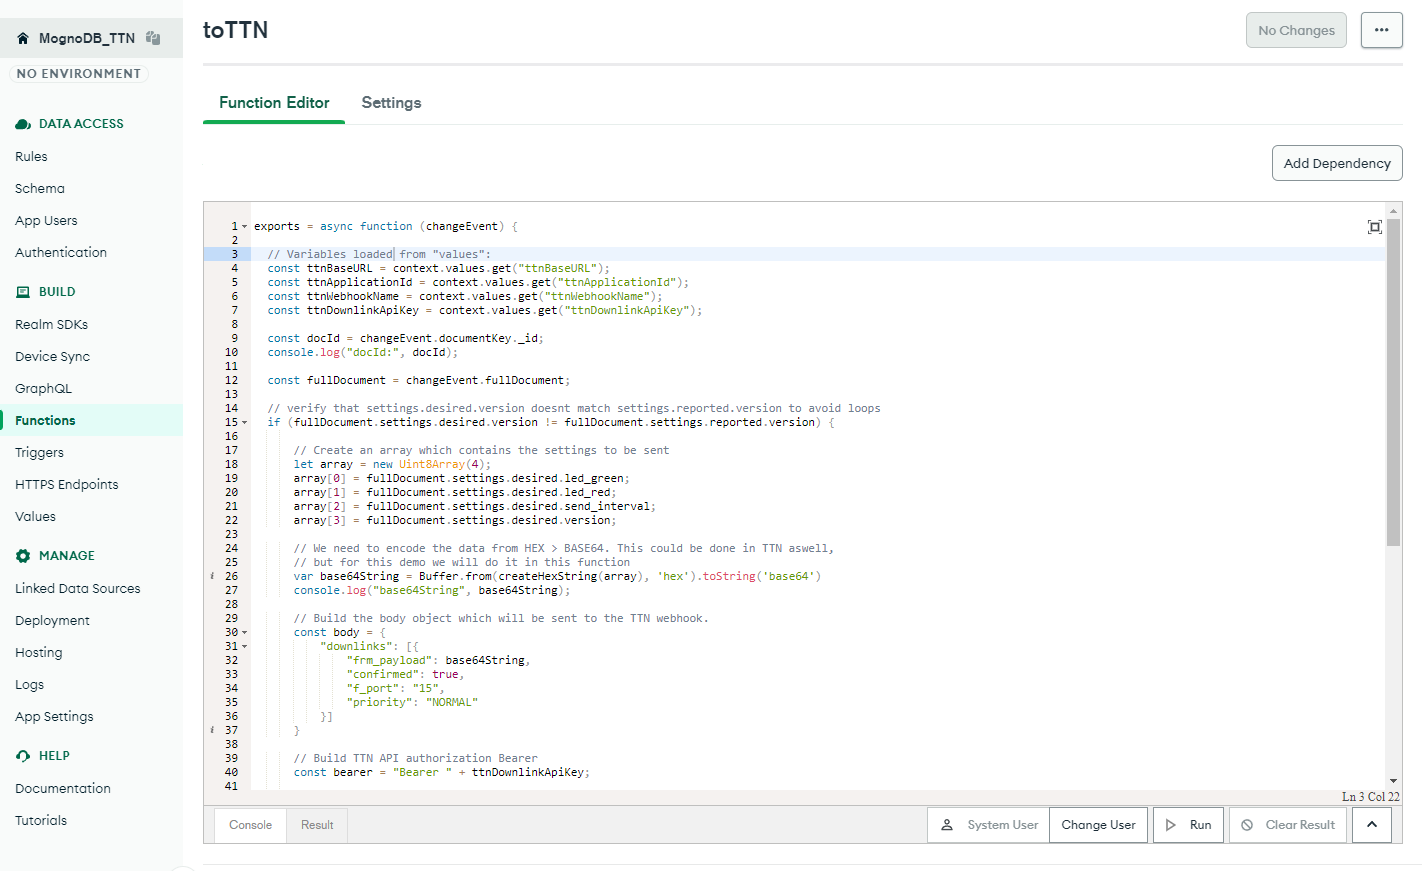
Next we create the function which will be executed by a trigger when there is an “onChange” event in the deviceTwins collection:

On the “Function editor” tab. Insert the following code which will:
- Verify that the desired version number differs from the reported one in the changed document avoid loops.
- Encode the settings.desired to a BASE64 string.
- Send the data thru a HTTP POST to The Things Network.
exports = async function (changeEvent) {

  // Variables loaded from "values":
  const ttnBaseURL = context.values.get("ttnBaseURL");
  const ttnApplicationId = context.values.get("ttnApplicationId");
  const ttnWebhookName = context.values.get("ttnWebhookName");
  const ttnDownlinkApiKey = context.values.get("ttnDownlinkApiKey");

  const docId = changeEvent.documentKey._id;
  console.log("docId:", docId);

  const fullDocument = changeEvent.fullDocument;

  // verify that settings.desired.version doesnt match settings.reported.version to avoid loops
  if (fullDocument.settings.desired.version != fullDocument.settings.reported.version) {

      // Create an array which contains the settings to be sent
      let array = new Uint8Array(4);
      array[0] = fullDocument.settings.desired.led_green;
      array[1] = fullDocument.settings.desired.led_red;
      array[2] = fullDocument.settings.desired.send_interval;
      array[3] = fullDocument.settings.desired.version;

      // We need to encode the data from HEX > BASE64. This could be done in TTN aswell,
      // but for this demo we will do it in this function
      var base64String = Buffer.from(createHexString(array), 'hex').toString('base64')
      console.log("base64String", base64String);

      // Build the body object which will be sent to the TTN webhook.
      const body = {
          "downlinks": [{
              "frm_payload": base64String,
              "confirmed": true,
              "f_port": "15",
              "priority": "NORMAL"
          }]
      }

      // Build TTN API authorization Bearer
      const bearer = "Bearer " + ttnDownlinkApiKey;

      // Call the TTN webhook and tell it to send the data to the device.
      const response = await context.http.post({
          url: ttnBaseURL + "/api/v3/as/applications/" + ttnApplicationId + "/webhooks/" + ttnWebhookName + "/devices/" + fullDocument._id + "/down/replace",
          body: body,
          headers: { "Content-Type": ["application/json"], "Authorization": [bearer] },
          encodeBodyAsJSON: true
      })

      console.log("response:", response.status);
  }
  else {
      console.log("Required and reported versions match. Nothing to do....:", docId)
  }
};

// Helper function to create a hexString from an array
function createHexString(arr) {
    var result = "";
    for (var i in arr) {
        var str = arr[i].toString(16);
        str = str.length == 0 ? "00" :
              str.length == 1 ? "0" + str :
              str.length == 2 ? str :
              str.substring(str.length-2, str.length);
        result += str;
    }
    return result;
}
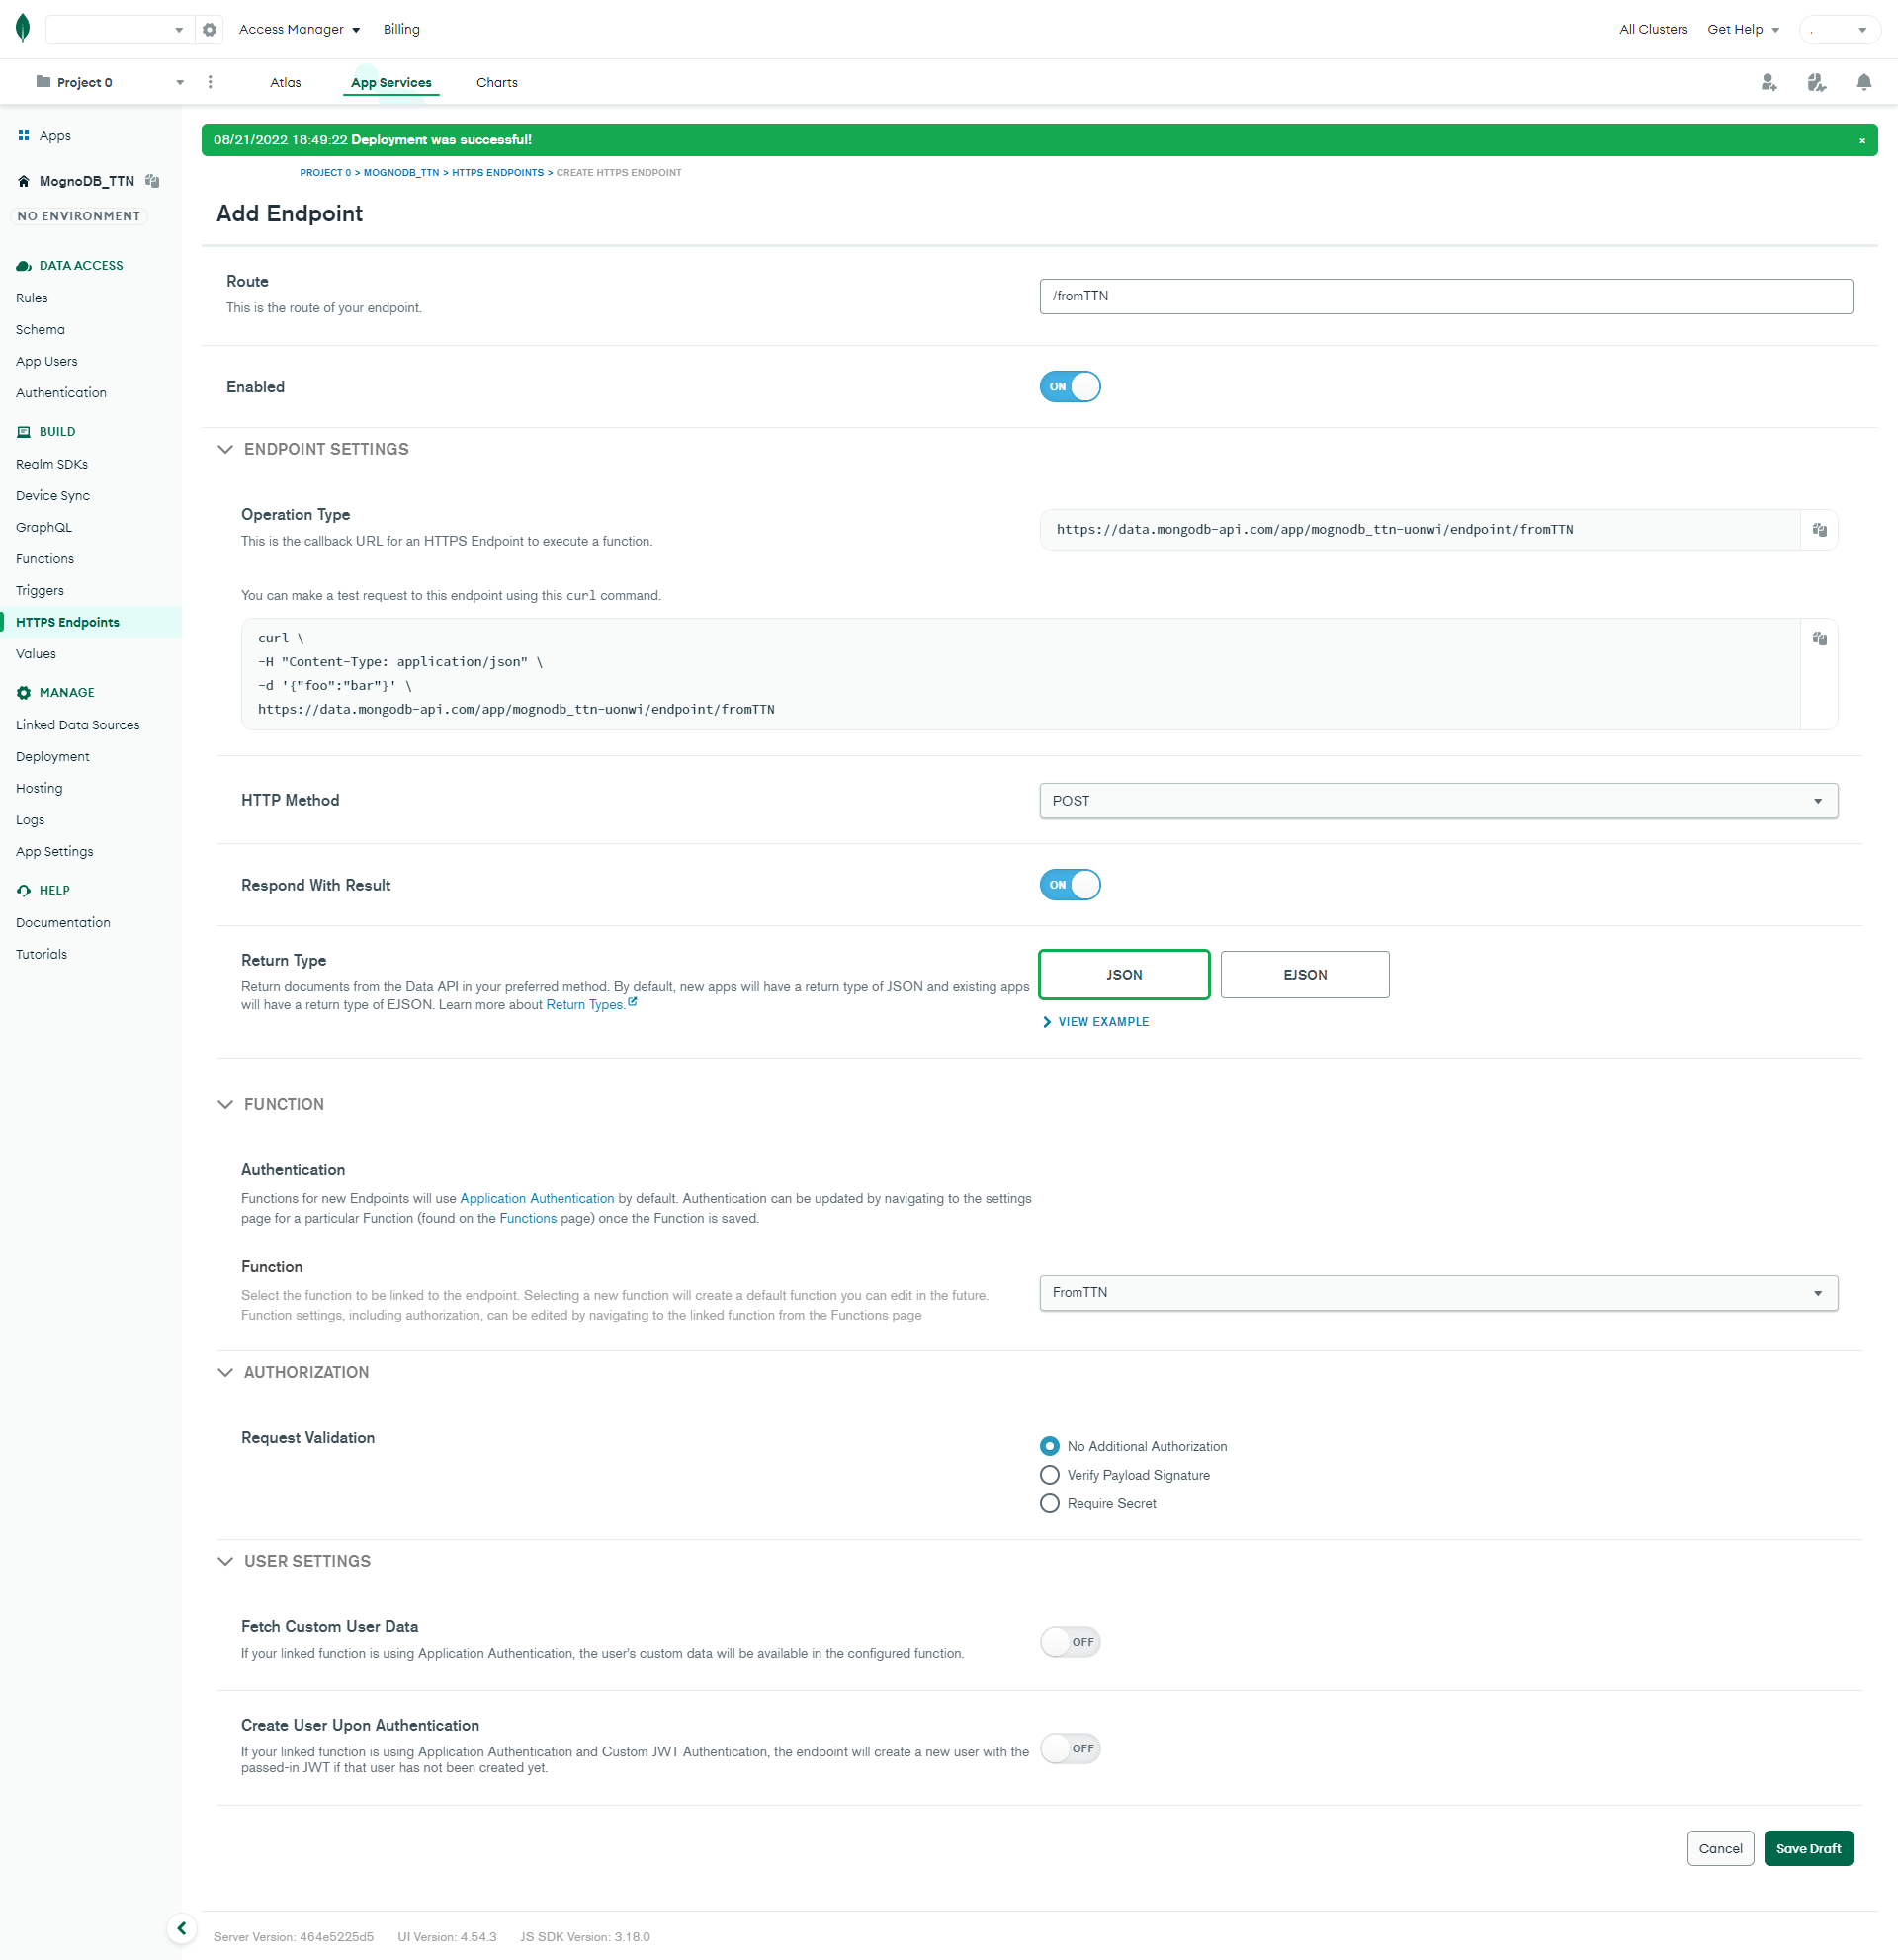
Create HTTPS Endpoint
We need a HTTPS Endpoint in MongoDB App Services. Here we select the “fromTTN” function created earlier. Take note of the URL shown and insert it into the TTN configuration performed in earlier:
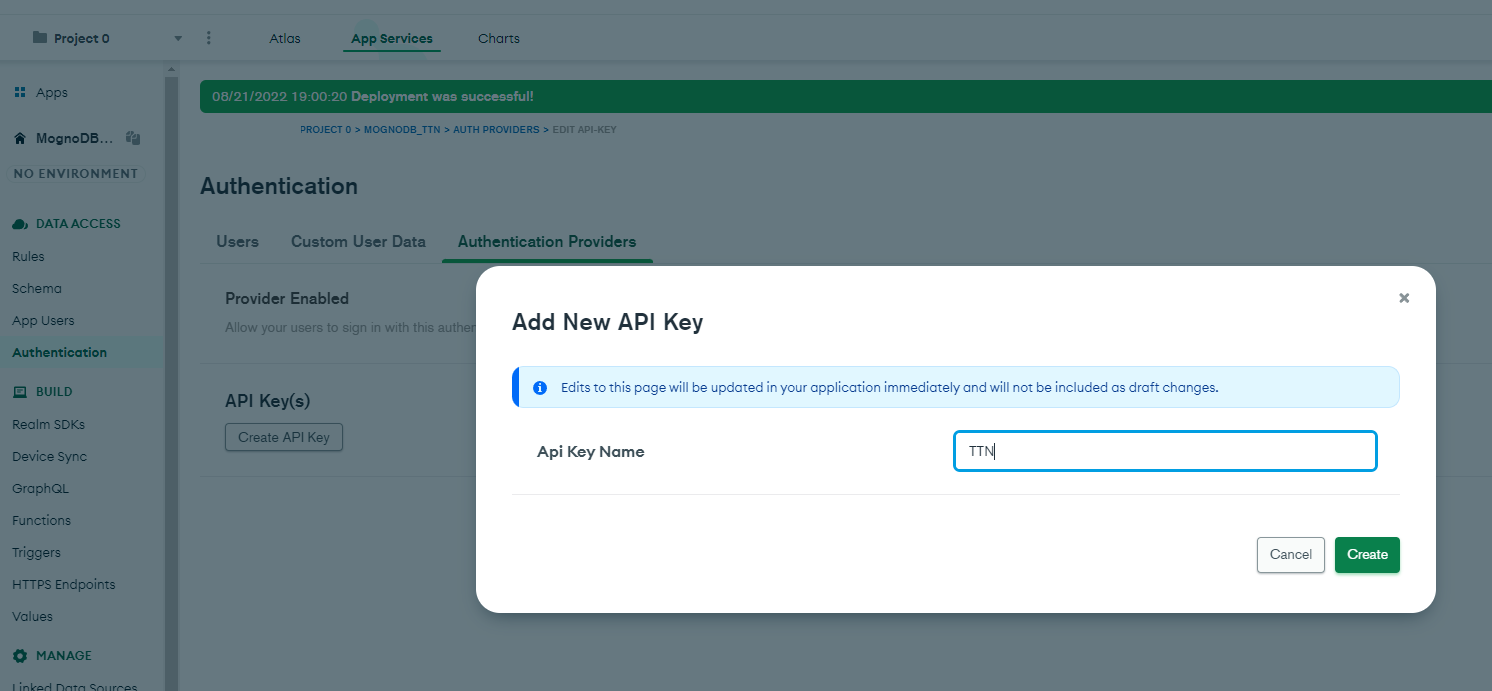
Create API Key
A API-KEY required to authorize TTN. We create one thru “App Users”. Insert this key into the TTN console in earlier steps:
Copy the uniq ID of the User. We need this ID later when we create the permissions under rules:

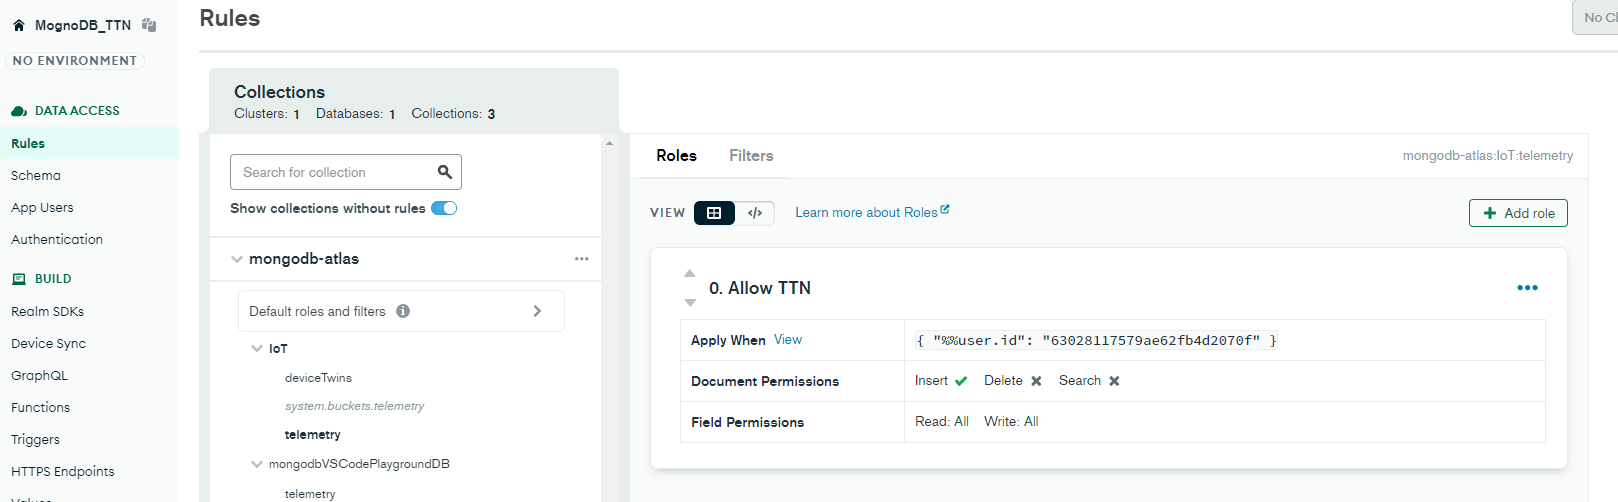
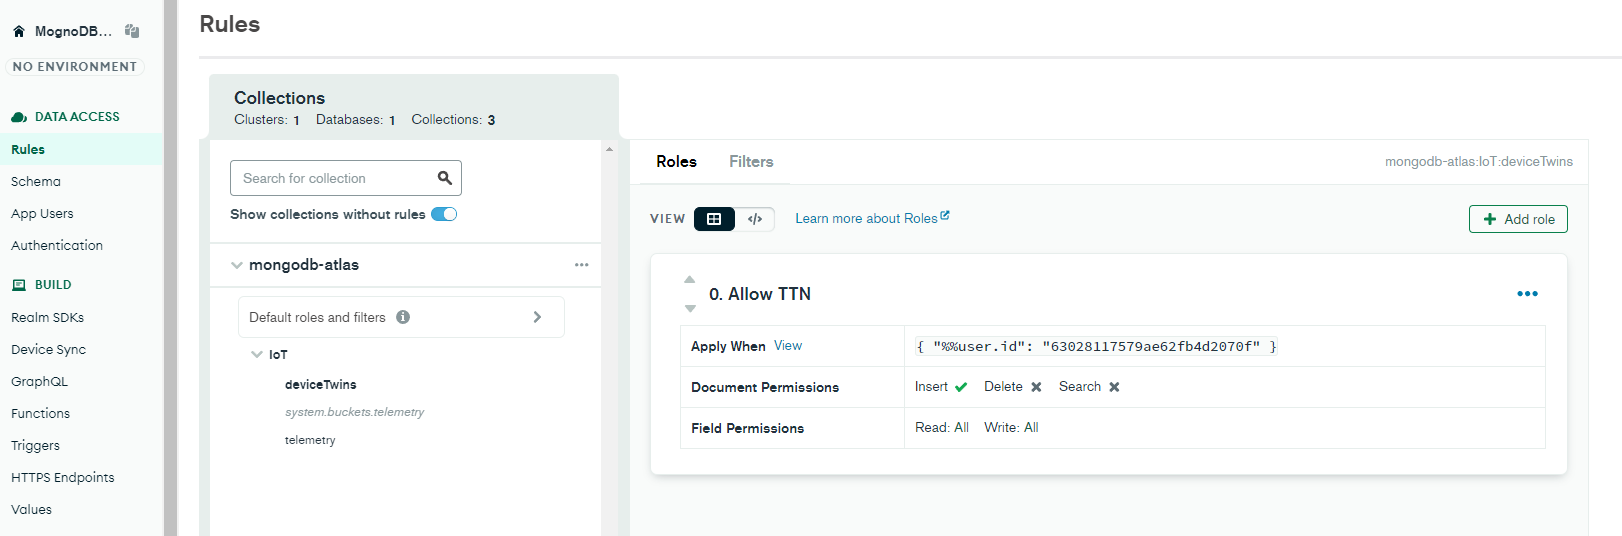
Create Rules
Rules are permissions that we need to configure to allow our functions - initiated with the “API-KEY” user - to write to the database collections.
We will delegate insert permissions onto the deviceTwins and telemetry collection with the help of the id on the API-KEY user we created earlier:
Add Trigger
A trigger will enable us to run a function when something occurs in the database. We want it to run our “toTTN” function when a document in the deviceTwins collection is changed:

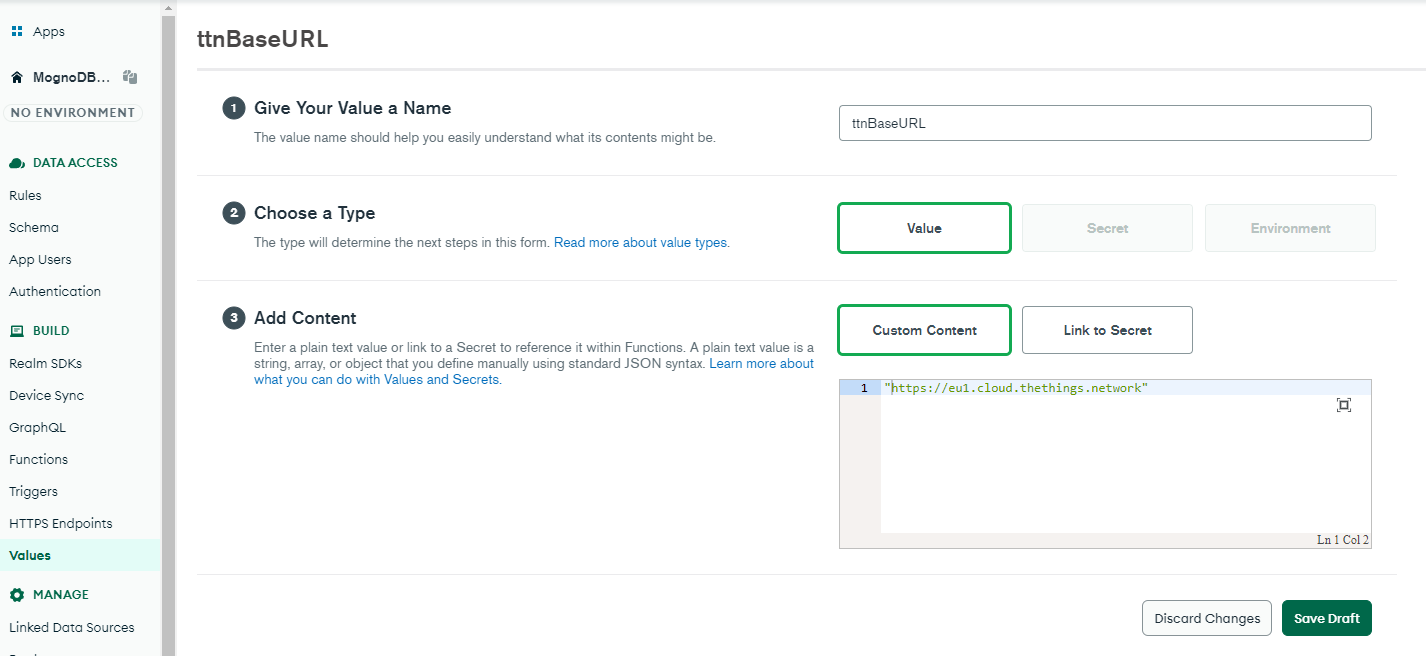
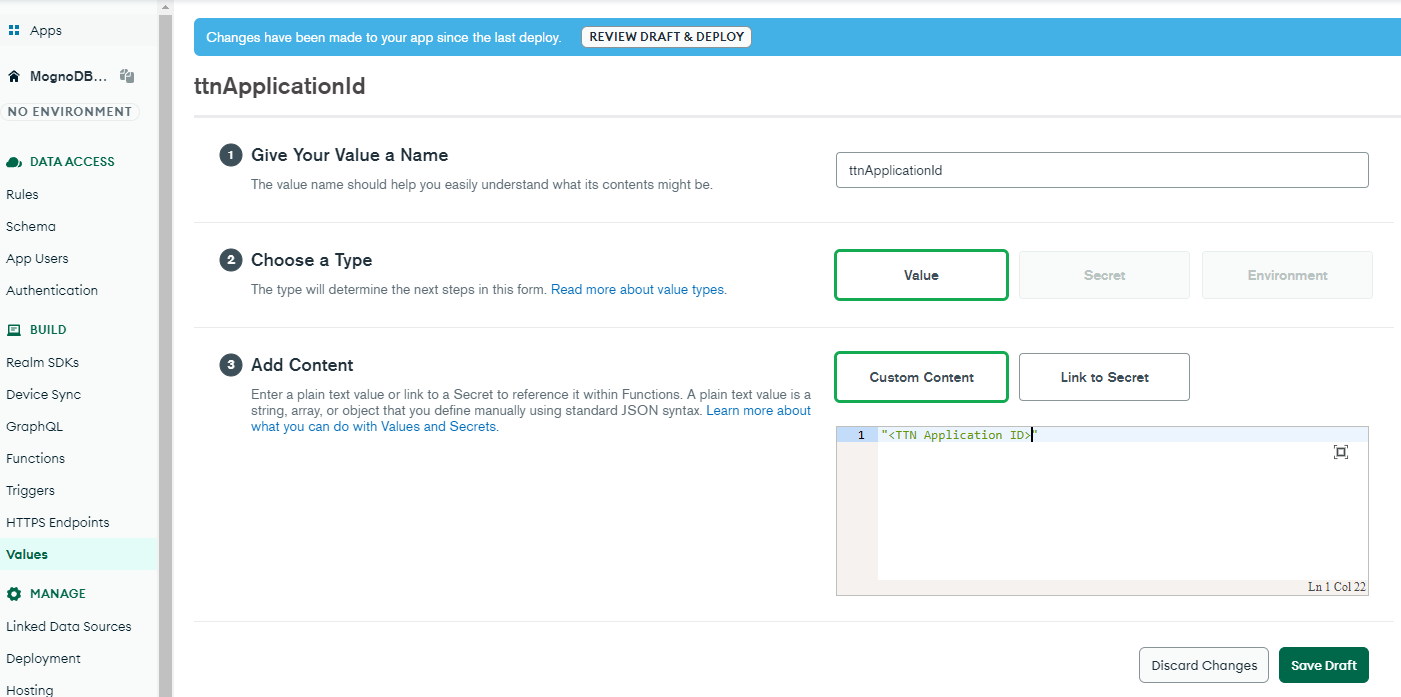
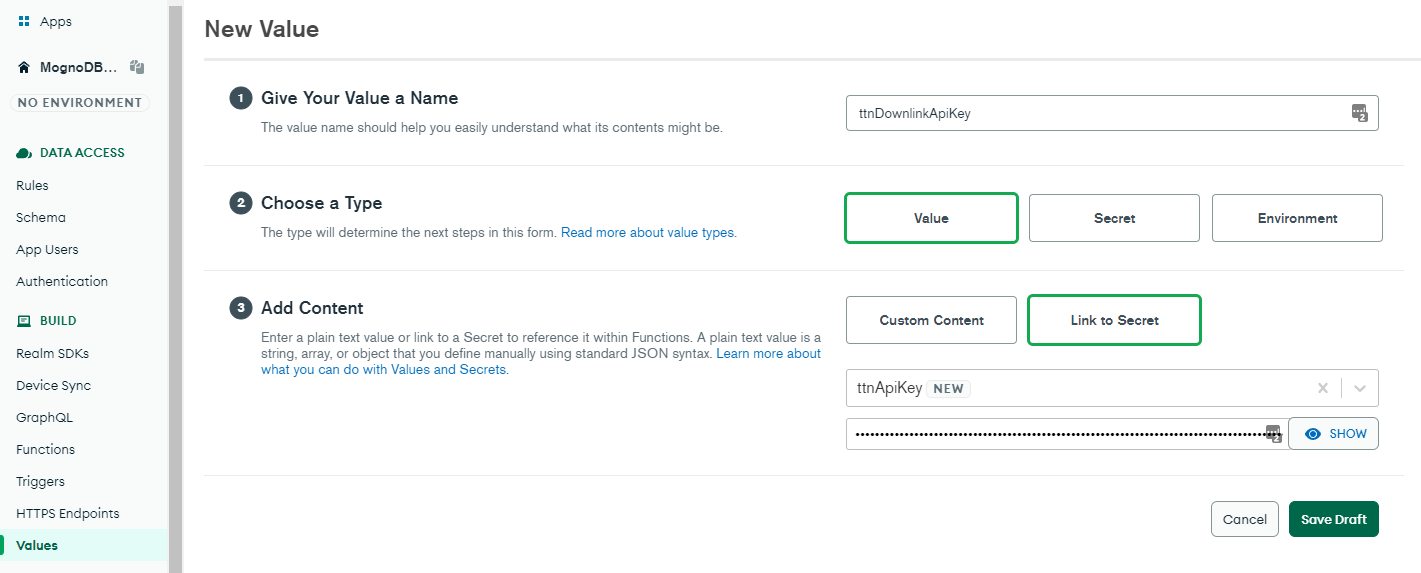
Add Values
The “toTTN” function requires a set of values to be declared to work as expected. These are values that we received from the TTN console earlier:

Testing
Time for testing.
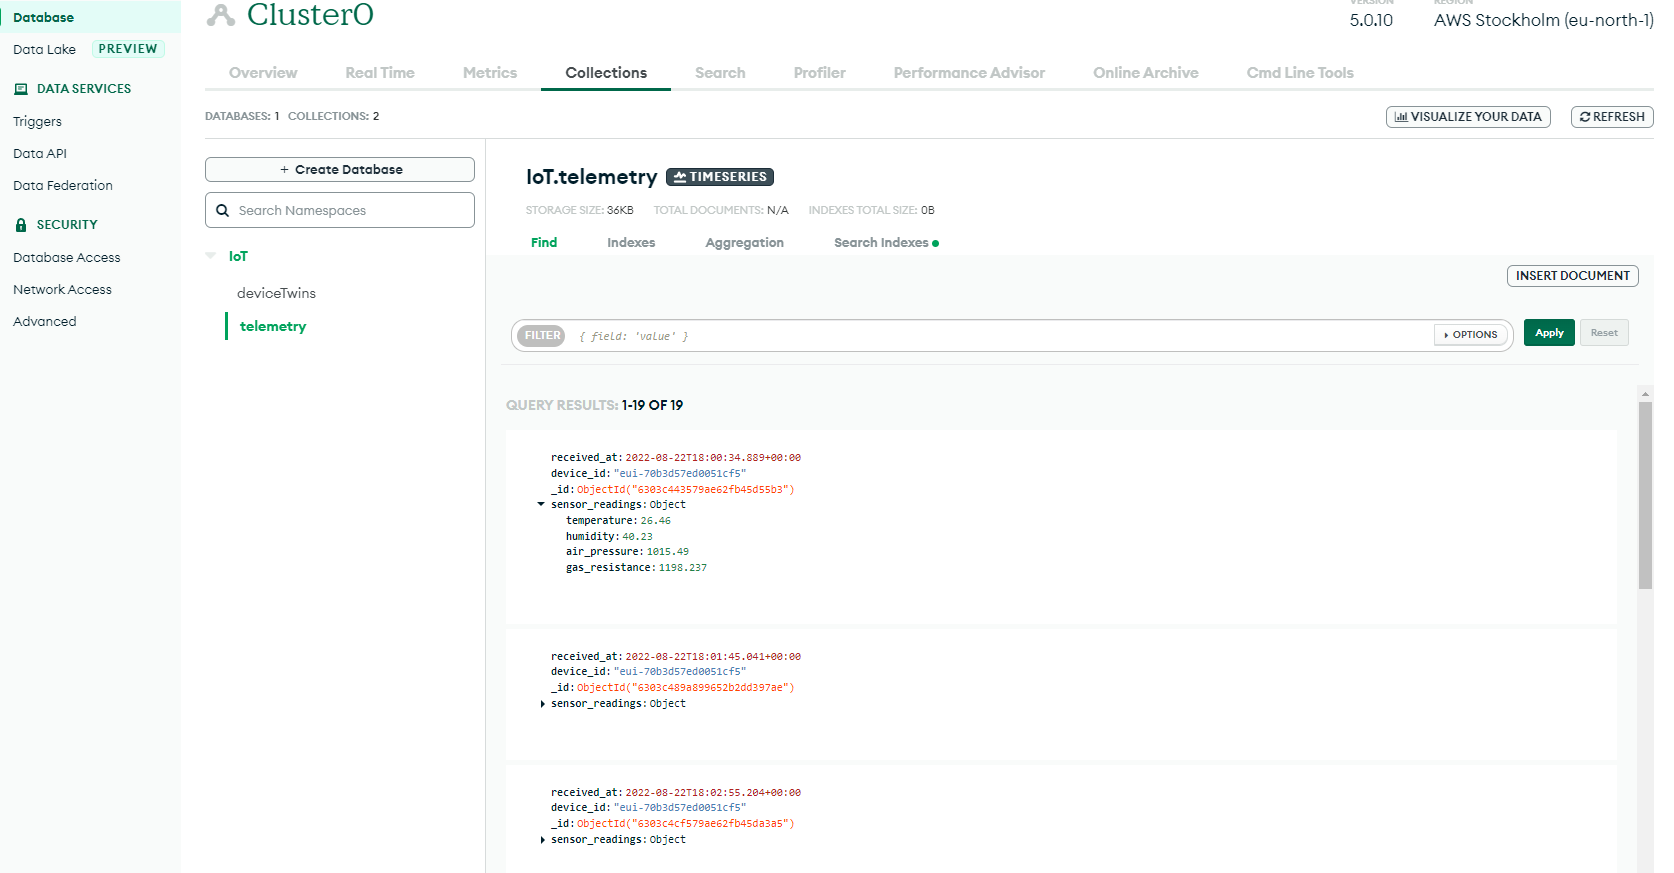
The uplink messages from the LoRaWAN device should now start to populate the telemetry collection:
If a change is made in on a document in the “deviceTwins” collection, the trigger is executed. The trigger function checks if the version number under desired vs reported matches or not. If the version numbers don’t match then a downlink to the device is scheduled thru the TTN webhook. The LoRaWAN device is working as a Class-A device, therefore downlink will occur after the next uplink:
The LoRaWAN device runs a custom firmware and will echo back the settings it receives. After the next uplink we see that the same version number is reported under reported: